


If you want to learn how to repair small holes in drywall, you are in the right place. Drywall is a significant component of home construction, providing smooth and sturdy walls and ceilings. However, it’s not immune to damage – small holes can form due to various reasons, like moving furniture or playful kids. Thankfully, repairing small holes in drywall is not as daunting as it may seem. With some basic knowledge, the right tools, and a little practice, you can fix these blemishes yourself, saving both time and money. This guide aims to equip you with essential tips and techniques to master drywall repair and make your walls look as good as new.
Understanding the Basics of Drywall Repair
Drywall, also known as wallboard or sheetrock, is made of gypsum panels sandwiched between two thick sheets of paper. Its purpose is to create a smooth, paint-ready surface for interior walls and ceilings. Over time, minor wear and tear, including small holes, can occur due to various factors. Understanding how to repair these imperfections is essential for maintaining your home’s aesthetics and structural integrity.
When it comes to repairing drywall, the size of the damage should guide your repair strategy. Small holes – typically those less than 1/2 inch in diameter – can usually be repaired easily with some basic materials and a bit of elbow grease. For larger holes, a more comprehensive approach might be necessary. In this guide, we’ll focus on repairing small holes, a task that even a DIY beginner can handle successfully.
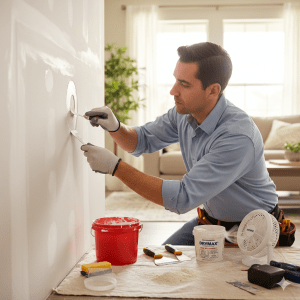
Gathering Essential Tools for Drywall Repair
Before starting your repair, gather all the necessary tools and materials, Home depot is the best choice . Having everything you need within arm’s reach will make the job easier and more efficient. For small hole repairs, you’ll need a utility knife, sandpaper (usually 120- or 150-grit), a drywall knife or putty knife, and a drywall patching compound or joint compound. A drywall patch kit can also be a great choice as it often includes everything you’ll need in one package.
Safety should always be a priority when undertaking DIY projects. Therefore, ensure you have protective eyewear, work gloves, and a dust mask to protect yourself from dust and debris. Lastly, have a damp cloth and a bucket of water for cleanup once the job is done.
Step-by-step Guide to Repair Small Holes in Drywall
Repairing small holes in drywall is a step-by-step process that requires attention and patience. First, use the utility knife to clean up the edges of the hole, removing any loose or fraying parts of the drywall or paper. Then, lightly sand the area around the hole to ensure a smooth, clean surface for the patching compound to adhere to.
Next, apply the patching compound with your drywall knife. Spread the compound over the hole, ensuring to feather the edges to blend with the surrounding wall. Allow the compound to dry completely as per the manufacturer’s instructions. Once dry, sand the area smoothly with your sandpaper, ensuring it’s level with the rest of the wall. Repeat these steps if necessary, then prime and paint to match the rest of your wall.
Tips for Achieving a Seamless Drywall Repair
To achieve a pro-like finish in your drywall repair, patience, and attention to detail are key. Always take your time to prepare the hole and the surrounding wall, ensuring they are clean and smooth before applying the patching compound. Also, remember to apply the compound in thin layers, allowing each layer to dry thoroughly before applying the next one.
Sanding is an essential part of getting a smooth finish. However, sanding too hard can cause more harm than good, creating unwanted divots in your wall. Instead, sand lightly and in a circular motion for the best results. Finally, use a high-quality primer and paint for a flawless finish that blends seamlessly with the rest of the wall.
Avoiding Common Mistakes in Drywall Repair
Avoiding common mistakes can make the difference between a successful repair and one that draws more attention to the site of the original damage. One common mistake is neglecting proper preparation. Ensure the hole and surrounding area are clean, free of dust and debris, and smooth before applying the patching compound.
Failing to allow the patching compound to dry completely between layers can lead to an uneven finish. It’s essential to have patience during this process and let each layer dry thoroughly. Lastly, hasty or heavy-handed sanding can damage the repair job. Always sand gently and gradually to achieve a smooth finish.
Maintaining Your Drywall After Repair
After successfully repairing the hole in your drywall, maintaining it is crucial to prolong its lifespan and keep it looking good. Regularly dust and clean your walls to keep them free of buildup that could cause damage over time. When moving furniture or installing fixtures, be careful not to scratch or dent the wall.
In areas of high moisture, like the bathroom or kitchen, ensure proper ventilation to prevent mold and mildew, which can damage drywall. If you do notice any signs of damage, tend to them promptly. With proper maintenance, your repaired drywall can remain in top shape for many years to come.
Mastering drywall repair can seem challenging, but with the right knowledge, tools, and patience, you can fix small holes like a pro. Remember, the key to a perfect finish is attentiveness and patience. Always prepare your surface well, apply thin layers of patching compound, allow it to dry completely, and sand gently for a smooth finish. With these tips in mind, you’re well on your way to becoming a DIY drywall repair expert, capable of maintaining the pristine appearance of your home’s walls.
0 Comments